Category Archives: OMTech

Wiring Laser Air Assist KT332N Controller

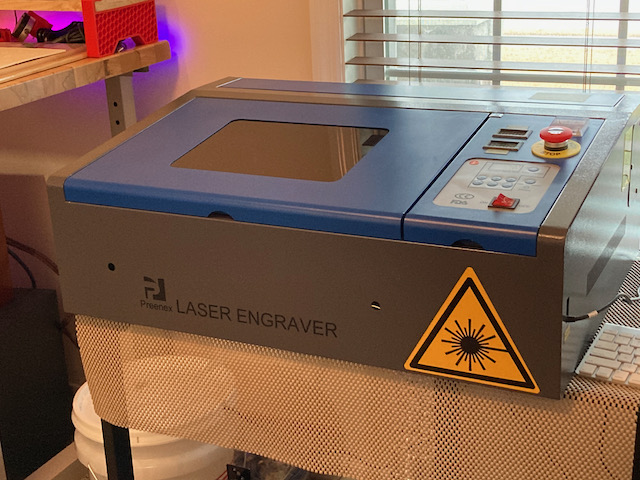
Wiring a 24 volt Laser Air Assist Solenoid to KT332N Laser Controller

Adding an external, more powerful laser air assist is a MUST DO upgrade for your CO2 laser.  There are many guides on how to do this however none of them are specific to a laser which has a Ryxon KT332N Controller.  Larger lasers use different controllers and the controller connections have a different name on them on the KT332N which may confuse some users.

I’m not doing an inclusive build of materials here. This will just cover wiring the solenoid to the controller.

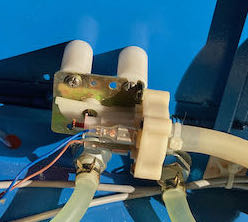
You will require a 24 volt Solenoid, normally closed. Let’s look at the parts required:

Continue reading

K40 Water Flow Sensor Upgrade

K40 Water Flow Sensor Upgrade

My K40 (and various other CO2 lasers) does not have a water flow sensor switch on it.   There are folks who put a water flow meter on the outside of their lasers which gives you a visual representation that the water is indeed flowing.  That’s great.  Until you turn your back and the pump fails causing water to stop flowing and your laser tube and power supply go “POOF”.

You would have to watch that flow meter 100% of the time to be safe.

With a water flow sensor switch it kills power to the laser firing circuit if no water flow is detected thus saving your precious CO2 laser tube and power supply.

The switch in the flow sensor is in the normally open position.  That means the circuit is BROKEN until water flows through the sensor and then the switch closes which ENERGIZES the laser firing circuit.

In fact laser power supplies have a protection circuit ready to roll.

Continue reading

OMTech Laser Water Flow Sensor Upgrade

OMTech Laser Water Flow Sensor Upgrade

CO2 lasers are water cooled.  If the cool water stops flowing the laser tube will die.  That’s all there is to it.   To prevent the laser from firing when there is no water flowing most lasers incorporate some kind of switch that chops power to the laser circuit when no water flow is detected. In this blog we’ll show how to upgrade the OMTech Laser water flow sensor.

The OMTech Laser Stock Sensor

My new 50 watt laser has such a switch but forums are FULL of reports of failures and especially the fact that the switch will begin leaking.

Crap Water Flow Sensor

While this may not be the exact switch, it is darn similar. There is no outlet port on these things.  The switch is hooked to a Y valve.  One side is inlet, the other is inlet flow and the top opening goes to the switch.

In my mind that doesn’t really measure “Flow”, rather the fact there is water pressure present on the switch.

Continue reading

OMTech 50 Watt CO2 Laser

OMTech 50 Watt CO2 Laser

Got my new OMTech 50 Watt Laser today.

I also own 2 Ortur Laser Master 2 – 20 watt diode lasers and a K40 Laser also from OMTech. NOTE: I sold both the K40 and the Ortur LM2’s

After tons of research I have decided that your best bet on buying a Chinese laser system is to buy it from OMTech.  Your mileage may vary and in fact some people’s mileage DOES vary.   That has NOT been my experience.

The K40 I bought from them and now this 50 watt machine………JUST WORKS. Right out of the box. No damage.  Not one scratch.  Not one dent.   The machines both came aligned right out of the box.

Shipping was fast,  the price was competitive albeit you could save a few dollars by buying from other dealers.  I don’t recommend it unless you are prepared to take a machine out of the box and spend time aligning it and making it right.  If you posses those skills then by all means…….save some money.  Me. I posses those skills but it isn’t worth $50 or $100 to me to do all that quality assurance and work.

Now. let dig in a little.   Just some stuff you need to know up front.

Continue reading

K40 UPGRADES

K40 UPGRADES

OMTech K40 Laser Upgrades

The Chinese laser often referred to as the K40 (40 watt) is an entry level CO2 laser at a magnificent price point.  They can be had for around $350 to $450 dollars depending on where you get them and how you get them configured.

I got mine from a place called OMTech for about $420.  It is also were well configured and has many upgrades already included.

Right out of the chute these things engrave and cut well although the 40 in K40 seems to be a bit of a gimmick.  A lot of the included laser tubes are actually 30 to 35 watts.  It’s really not enough to kick a fuss up over.   It’s just the way it is.  So that kicks off the upgrade discussion.  You can buy larger and more powerful laser tubes.

Once you use one of these things a bit and learn your way around one you’re going to want to upgrade some things.  While they do indeed come at a magnificent price point the old adage applies.  You get what you pay for.

Continue reading

K40 Laser Milliamp Meter Mod

K40 Laser Milliamp Meter Mod

A K40 with a digital control doesn’t actually indicate actual laser power.  The only way to reliably measure the current from a laser tube is to add a milliamp (mA) meter to your K40.  While there are a lot of differing opinions on max power draw most agree it is somewhere between 18 and 20 mA’s.  Some people even pull short at 15mA to improve tube longevity.

Continue reading

K40 MINI-GERBIL CARD UPGRADE

K40 MINI-GERBIL CARD UPGRADE

I recently bought a K40 Laser from OMTech. Most people use a free software mix for the K40 utilizing Inkscape and K40 Whisperer but there is a far better software solution (not free) called Lightburn. But a stock M2 Nano card will not work with Lightburn. We need to upgrade to an AwesomeTech Mini-Gerbil card.

I liked K40 Whisperer and was getting the hang of it.  It’s actually pretty powerful and it really is a good hunk of software but it just isn’t Lightburn.  No knock at all on K40 Whisperer intended.

Most K40 lasers come with a control card called an M2Nano which is not compatible with Lightburn.  The only way to run Lightburn on a K40 is to purchase a new controller card.  There are several options out there but I went with the Mini-Gerbil from AwesomeTech.  I just got the card and installed it and as always took notes while doing the installation and ran into a couple of noteworthy things that I thought was worthy of a blog.

Continue reading