
Ortur Laser Master 3 Review
First Impressions
I’m a little late to the show on this one and the Ortur Laser Master 3 has been reviewed to death on the internet. It was released around mid-July 2022 so it took me around 5 months before I got my hands on one.
I previously owned two Ortur Laser Master 2’s and I considered the LM2 to be the first real viable, non-DIY desktop laser out there. I sold one of them about a month ago, and the other just a few days ago and took the proceeds from those sales and picked me up a Black Friday priced special.
Now I currently own an OMTech 50 watt CO2 laser and an xTool D1 Pro so the Ortur Laser Master 3 has some stiff competition. This blog will be strictly my first impressions and not an overall review of the machine.
First of all, while it was in the mail I watched all the assembly videos and read all the blogs and tried to get up to speed as much as possible. The Ortur Laser Master 3 has perhaps the easiest build of any desktop laser I’ve ever owned. However, there was one catch and that catch left me FUMING.
Read on.
THEY SENT ME A SHITTY FRAME
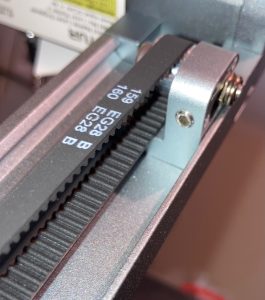
After you assemble the rear and both sides you install the idler assemblies. They are just pulleys and they themselves are easy to install. To tension the belts you install a set screw which pushes the idler back and pulls the belt tight. There is one on each side.
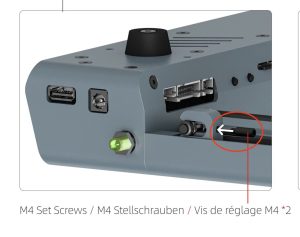
Idler Set Screw Installation
I grabbed one set screw and spun it in by hand to about the point you would begin to tighten. Then I moved to the other side. The set screw went in a couple of turns and then STOPPED. I pulled it out, looked at it, and put it back in. It stopped again.
Then I took the set screw out of the other side and it wouldn’t go in either. So I did an inspection and the internal threads looked like they were cut by a drunken machinist. Or that this frame piece had been sold before and someone cross threaded the set screw and then returned it and lucky me ended up with it. Looked like just one thread was rolled so I tried to run the set screw in and promptly jammed it up and locked it in place. Had to take it out with pliers because the set screw head stripped out. Nice.
I FIX THEIR FOUL UP
Then I got an M4 tap and hand tightened it. Then I gave one tiny turn on it with a socket and I felt the offending thread clear. Finally, I then took an M4 machine screw and hand threaded it in. I got the set screw in successfully after that but when I got it tight it didn’t act like it wanted to turn anymore because of the stripped head. So then I emailed Ortur Support and they offered to send me a couple of new set screws. I feel like it is perfectly installed and tensioned but I’m worried about what happens if I need to re-tension it. That allen head is stripped and while I know it will turn backwards, I know it doesn’t want to go in further. A replacement set screw will put this installation back at 100%.
Fuck You, I win!
But let’s call this what it is. It’s bullshit. I was sent a crap part made by the aforementioned drunken machinist or a damaged, returned part ended up in my new kit.
After I got it installed I burned my name in a piece of scrap wood and determined that the machine itself worked just fine. So I called it a night and then decided my next action would be to hook it to wifi the next morning.
UPDATE: I 3D printed some FFT legs and went to install them. After removing one of the feet there were horrific tool marks hidden under one foot. I am now 100% certain I got a frame assembly that was damaged and returned and thrown back in a box and shipped to old dopey me who was expecting a brand new laser for $550.
WIFI FROM HELL
Hooking up the WiFi was almost as much fun as running an M4 metric tap to fix the shitty part they sent me. I watched the Official Ortur WiFi hook up video and read the installation guide and absolutely none of that stuff worked. I must have tried it 10 or more times. Then suddenly I get a failure connecting to my wifi for the 10th time and then I reboot the laser and son of a bitch if it doesn’t have a Local IP address. I have no idea what I did to make it work, in fact I’m pretty sure I did nothing to make it work.
On my network the laser reports as “Espressif” during a network scan. According to Ortur specs it uses an ESP32-S2 Internet of Things (IoT) chip. I have several ESP32 devices on my network and none of them have any issues connecting to an internal hotspot and then connecting to your local wifi network so I don’t really understand what is going on here. Maybe Ortur should investigate using Tasmota firmware on their ESP32 chip which is rock solid. Whatever they are using is not rock solid.
TAKE OVER MY NETWORK, PLEASE
On WiFi and Laser Explorer an FTP server is running. And a TELNET server. Both are on standard ports, 21 and 23, respectively. The FTP server allows anonymous login with no credentials. So does the TELNET server. IF YOU AREN’T RUNNING BEHIND A HARDWARE FIREWALL AND YOU EXPOSE AN OPEN AND UNSECURED FTP AND TELNET SERVER TO THE INTERNET YOU ARE JUST BEGGING TO GET HACKED.
MOVING ON
So far, I’m far from a happy camper, but my laser is assembled, and I just had trouble doing it. And I am connected to WiFi, but I just had trouble doing it. I recently built my xTool D1 Pro and then shortly thereafter rebuilt it with their extension kit and didn’t have so much as a hiccup with either build. So simply from an initial impressions stand point, color me unimpressed and unhappy.
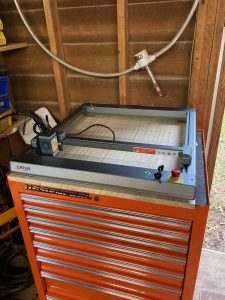
The web interface is cool, however I haven’t tried to connect wirelessly to Lightburn yet. That’ll be cool if it works. Especially considering where I want to install it at in my back yard shed on top of a tool box. No real room to tether a computer next to it easily. So if that works good then you can color me impressed.
Look Ma, No Wires!
UPDATE: I made a spoilboard, burned a grid on it and then made a Device in Lightburn using Ethernet/TCP by adding the LM3’s local IP address. It works. Then I did a few test burns on scrap and they came out as expected.
So then I took the laser out in my back yard shed and it connects to wifi just fine. I do have some concerns that it might choke on more critical or on lengthier jobs. For the jobs that I’m scared could choke due to network issues, I’ll probably go ahead and tether to my laptop but I’ll continue to mess with using wifi and will have more input later.
BURN, BABY, BURN
So I put some scrap wood down and started doing stuff. And here’s where it gets better. It did all the stuff I told it to do, in the right place, positioning was accurate and repeatable, and man, it seemed FAST.
Then I put a thicker piece of wood in the machine and the X motor that hangs low to the ground wouldn’t pass over it. Without doubt, question, or fail, the machine will need to be raised some to be viable.
I should point out that the low clearance issue doesn’t block any of the usable area but it does prevent you from having a larger piece of material pass under the frame.
I’m actually not going to say bad words about this because raising the machine is easy, and this is kinda, sorta a common problem with diode desktop lasers because all four corners set on the desk and need to be within range of the adjustable Z height.
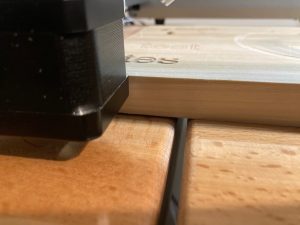
Low Bridge!
But I do believe the Ortur Laser Master 3 may be a bit worse in regards to clearance issues than other lasers I’ve owned. But I’d also be willing to bet the high speed of the machine is achieved by keeping the frame low and keeping the weight down there low with it.
FFT LEGS
The LM2 had some minor clearance issues but the cool thing about the LM2 was that they put a downloadable copy of their acrylic plastic parts on line for download. I downloaded the 4 feet and then stretched them to make them longer in Lightburn while maintaining the existing hole patterns. Easy money. And I loved it. Oh, those were the days.
The FFT lifting legs on the Ortur Laser Master 3 cost $79 WHEN ON SALE, which is a bit steep if you ask me. Thingiverse has 3D printable ones which of course are free. Or you can grab 4 soup cans. Again, lifting a laser for clearance is not a big deal, and you use what works.
I 3D printed some FFT legs and they work fine, however you just can’t win with this Ortur Laser Master 3. The legs, when stowed raise the machine up sufficiently to slide a piece of material in from the sides because it lifts that low hanging stepper motor, BUT NOW FRONT TO BACK IS MOSTLY OBSTRUCTED. Someone needs some new Design Engineers.
Fix The X, Break The Y (click pics to enlarge)


Another weird thing about the machine is that there are two cables labelled C and Z which are unused.
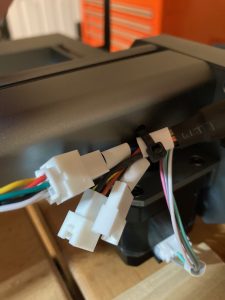
Unused connectors?
I’ve been scratching my brains trying to figure out what kind of upgrade device they may be hooked up to.
Hopefully it will be something cool and impressive.
If nothing is ever forthcoming then I have to add that having those two unused cables is some stupid shit.
Could be C for Camera. Now that would be cool! Let’s hope. The Z could be for a motorized, adjustable Z height. Also cool.
One good thing though is the GRBL code is open and unlocked and user modifiable by inputting commands to the console. No matter how much of a novice laser user you might be it will serve you well to learn some of these code settings and what they do. When it all goes south then inputting $RST=* gets you back to day 1.
If you are a new desktop laser user you’ll likely steer clear of messing with the GRBL settings, but the more advanced you get at using your machine the more you might want to dabble with certain settings to fine tune your workflow.
SPARE PARTS
While you can buy a spare laser head, and I think everyone who intends to use their laser for BUSINESS should, you cannot buy a replacement main board. My Ortur Laser Master 2 had/have these parts available on AliExpress to order but it looks like those days are gone for this new offering. Also there is a piece of glass that acts as a protective shield to keep the lens clean and undamaged…..you can’t seem to buy that either. This part should be available to the users to hold as spares. I’ve read several reports of that glass cracking and Ortur upgrading to a quartz protective lens. Do I have the glass or the quartz? I don’t know. I should know, but I don’t know.
So I inquired to Ortur regarding the lens protector. First I was told it was under warranty for a year and if it failed to send a picture of it for a replacement. Then they told me they are not for sale. What that means to me is that if your lens protector breaks, and I have read multiple accounts on forums of breakage stories, that you will need to buy a whole new laser module after 1 year. THIS ALONE SHOULD BE CAUSE TO NOT BUY AN ORTUR LASER MASTER 3.
INITIAL IMPRESSIONS
So my initial impressions are that it’s a neat little laser with a few cool features ……………but that I’m not impressed, especially when compared against its main competitor, xTool. But once again I have gotten past the worst of it. Some day to day usage and doing some actual work on this thing will reveal whether it is a hit or a dud. I suspect the machine will perform well from this point on but getting to this point was rife with strife. Strife I’ve never experienced on other lasers and this is far from my first rodeo.
PROS AND CONS
PROS
- GRBL Settings can be changed by user.
- Possible upgrade path for new features (2 unused connectors).
- WiFi functionality that works with Lightburn. (If you can get it working). WiFi also made the CONS category.
- The motherboard is inside the frame. I always hated exposed motherboards.
CONS
- Poor Quality Control. My frame had damaged internal threads on the idler housing right out of the box.
- Poor clearance. You might have a 400 x400 mm bed and that space is usable but if you have a piece of material longer than 400 mm that you need to pass through the machine you’ll have to raise the machine to allow for clearance.
- Raising the laser costs $99 if you do it their way with their FFT legs. ($79 on sale).
- WiFI was hard to set up.
- When connected to WiFi a TELNET and FTP server are alive and ready to accept connections with no security. Being able to use WiFi is a cool feature but not at the expense of compromising your network security.
If you have a home router hooked to a modem and that describes your wifi situation you need to get in your router settings and ensure incoming requests from the internet to Ports 21 and 23 are rejected. If you have no clue what that means, you need to give a 6 pack to the family computer geek to do this for you.
CONCLUSIONS
So far, from a strictly initial impressions standpoint the Ortur Laser Master 3 is not nearly as impressive to me as the xTool D1 Pro. The xTool has a heavier, more solid build, with no build issues that I encountered. They also have a 20 watt laser head, and an IR module and a superior rotary.
NOTE: Ortur just released an new rotary upgrade from the old YRR.
I still will concede the build from the Ortur LM3 was EASIER, but easier doesn’t always equal better. The xTool D1 Pro has adequate clearance all the way around the frame, and their lifting devices to raise the machine only cost a few dollars. They were provided in the kit I received as well.
This is far from my first rodeo. I have built multiple 3D printers, designed one 3D printer from scratch, and assembled untold number of desktop lasers. I’m not a novice at this. If you can only afford one desktop laser you should probably buy the xTool D1 Pro.
GRBL
The only reason and I mean the ONLY REASON you might prefer the Ortur LM3 is for the ability to alter every single GRBL setting. Only a super, super advanced user might have an interest in this. If you are punching out leather ball cap patches, and making Christmas ornaments to sell at the Flea Market, this is probably something you would never mess with.
On the flip side of Open GRBL settings is that new users can mess up a 3 axis machines movements REAL BAD by playing around in the GRBL settings. Locking it down some means a lot less headaches for the manufacturers support teams. There are pros and cons to both sides of this argument. I would be willing to bet though, that most laser purchasers are new users looking to start a small business. That new user should use great caution when someone tells them to do anything but type “$X” in the machine. $X kills an alarm lock out state.
Given your choice between Ortur or xTool you should probably buy the xTool D1 Pro. That’s my opinion, and I’m sticking with it.