Sculpfun gave me a Sculpfun S9 for review and I posted my initial impressions about a week ago. After a week of some testing and more usage I can provide a more authoritative opinion on the laser. In a nutshell I find that the S9 is far above average for the price point that it resides in. In my opinion this would make an excellent entry level laser for someone. Or even better, it would make an excellent back up machine for a home business or side hustle.
I read a lot of laser forums. Everyday I read posts like this. “The laser has broken and I have orders to fulfill”. You’d be able to fulfill them if you owned a backup machine.
How I Test
I’m very impressed with some of the extensive testing I see by reviewers. But I don’t really do that here. With the exception of a couple of safety features, and a bump in optical output power, the desktop diode laser hasn’t changed much since it’s inception into the commercial marketplace in around 2019.,
A 5 watt laser will perform similarly across the board unless some horrific engineering mistake was made. Also, a 5 watt laser will cut similarly to any other 5 watt laser. There are far too many variables in wood and grain patterns to perform viable cutting tests. If you buy a laser for cutting, a 5 watt laser is not ideal. What I find important:
- Repositional Accuracy – That is defined as the ability to make a subsequent laser pass in EXACTLY the same place as the 1st pass. Not all lasers do this well. However, since the advent of 32 bit motherboards they are performing better.
Repositional Accuracy Testing
The Sculpfun S9 does not have limit switches. When working in Lightburn software you should only engrave from “Current Position” or “User Origin” and not “Absolute” coordinates.

Testing Settings
Because there are no limit switches on the S9 and you start with the laser head in the front left position, the laser will head to the coordinates for the burn. After completion it will attempt to return where it started. Because of the lack of limit switches it doesn’t really know exactly where X0, Y0 is at. If you perform a 2nd pass you may experience some line doubling.
Only use “Absolute” if you know for 100% sure that you won’t need a 2nd pass to darken things up.
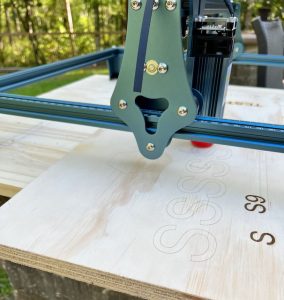
Here is a video I made showcasing the accuracy of the Sculpfun S9.
Cutting
Again, this is a 5 watt laser. If you need to cut thick wood consistently, cleanly, and fast, you need a high power CO2 laser. Blue diode lasers are capable of good, clean cuts on thinner materials. I’m going to take some thin plywood and do some test cuts.
It is important to note that when cutting with a diode laser some focus adjustments need to be made. If you set your focus with the height block your optimum laser efficiency is aimed AT THE TOP OF THE MATERIAL. As it goes down, it will lose efficiency. You need to aim your focus BELOW the top surface. For example. With a piece of 3 mm plywood I would probably want to drop my laser focus down 1.5 mm approximately.
This is where testing and experience come into play. I have seen many people complain about their lasers cutting ability when they are not compensating for the focus. Additionally ,in the video below I took a piece of notoriously bad for cutting 5mm, 3 layered plywood, that has an awfully nasty, hard to cut through glue. It took me 5 passes at 5 mm/sec and 100% power. I actually did not think it would cut through, but it did.
NOTE: I strongly recommend removing the IR safety shield when performing cutting operations such as demonstrated in the video. The shield traps the smoke inside. ALWAYS CLEAN YOUR OPTICAL SURFACES AFTER JOBS WHICH PRODUCE LARGE AMOUNTS OF SMOKE.
Sculpfun S9 Lens Cleaning
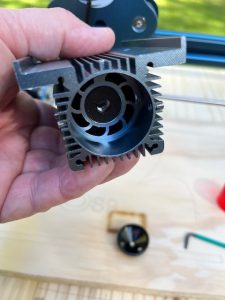
Lens Cleaning
Lens cleaning is more complicated than with typical diode lasers. The laser head has to be removed. Additionally, the IR shield must be removed, and inside there is a protective metal shield that also must be removed.
Mine didn’t really want to come out easily. There are 5 small #2 allen head set screws that must be loosened.
Additionally, ensure that you are working in an environment where you won’t lose any of those set screws. I didn’t lose mine, but I was outdoors and had I dropped one I’d have never found it.
Anyway, lens cleaning is a bit more work on the S9. But it still needs to be accomplished.
Pros
Securing
The laser head assembly is HUGE. It allows for a lot of Z adjustment and there are 2 set screws for tightening the laser head into position. Most lasers have 1 screw and it is usually up high on one side of the laser. Basically, that isn’t really conducive to getting a perpendicular alignment to your cutting material. The S9 excels here.
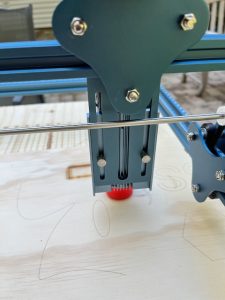
Securing the laser head
Silence
The S9 is quieter than most desktop diode lasers I have used. The movements from the main board are crisp and silent.
Clearance
Great clearance around the frame. It is so important sometimes to be able to pass an item through both sides, or front to back. The front to back pass through is slightly obstructed by the main board but ultimately, clearance is GREAT.
Frame Clearance
Cons
Other than the disassembly for lens cleaning I don’t really see many. The machine is solid, fast, and has great accuracy. And all for just over $250. There isn’t much to hate about that.
Discount Code
My readers can get 7% off by applying the discount code KJKXP7 at checkout at the Sculpfun store. This is only for the S9.
Cost of the S9 is what really sets it apart from other blue diode lasers. You simply cannot go wrong with this laser at this price point.
What’s Next
I purchased the limit switch modification kit for the S9. Stand by for a review in the near future on that! Thanks for reading!