
Monport Fiber 30 Watt Raycus Laser Deeper Dive
I have had my Monport Fiber laser (30 watt Raycus) for a couple of weeks now. After using it a couple of days I published my initial impressions here. Since that time I’ve learned a ton more about this remarkable laser. I have been having a ton of fun and making a few dollars in the process. Since my last review didn’t really include the 80mm rotary device, I will lead with that.
Also a good time to mention that my readers can get 10% off all Monport laser machines by using the code John10 at checkout.
80mm Chuck Rotary, Three Jaws
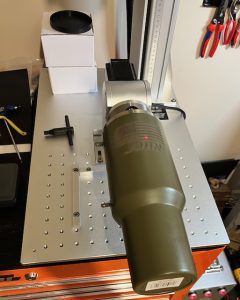
Included with my laser, Monport provided an 80mm, three jaw, chuck rotary ($409.99) for me to review.
And while it might just be the coolest accessory in all the land it doesn’t come with any documentation at all. But fortunately there are guides and videos all over the place that describe the process.
I’ll be going over how to set this up in Lightburn.
If you go into Lightburn Rotary Settings you’ll see this Setup page:
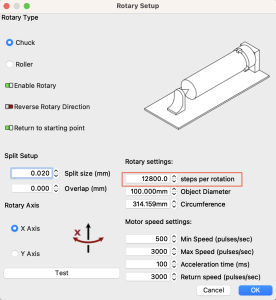
Just about everything here is intuitive EXCEPT your steps per rotation. Set it up as follows:
- Chuck
- Enable Rotary = on
- Split Setup 0.02 to 0.04
- Zero Overlap
- Set X or Y depending on your rotary installation direction. Mine is set to X
- Measure either your diameter or circumference. The other field will automatically calculate.
- Speed settings are fine
That leads us to the nasty steps for rotation calculation. There are two ways to obtain this.
- Try a bunch of settings until you find the right one.
- Take the settings directly from the chart on the stepper driver. (must open laser enclosure).
Steps Per Rotation
Remove the top cover of your laser enclosure. Take the top three screws off of the front and rear of the enclosure. Right on top is the Stepper Driver.
On the stepper driver itself are DIP switches. We want to note the orientation of switches 5 through 8. Down position = ON.
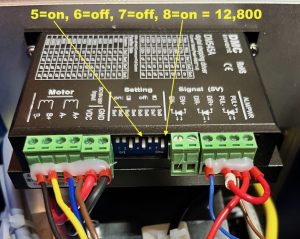
As we can see in the photo 5 is on, 6 and 7 are off, and 8 is on. Now we look for the corresponding configuration on the table on the driver case.
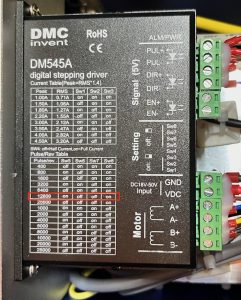
My configuration shows this as 12,800 steps per rotation. That is what you need to input in the Lightburn rotary setup.
Make A Label
Why this configuration information is not supplied on a data plate or sticker on the case I do not know. In their defense there are probably a lot of people who will buy the laser and not the rotary. Therefore they wouldn’t need to know the stepper driver configuration. Still. It should be accessible in the manual or on a sticker on the case. I’ll make a label and put it on the case.
Just be advised that the easiest way to find your steps per rotation is just to open the case and look.
Rotary Focus
I think you are supposed to test to find your optimum focus and then make a template to easily find focus. I haven’t gotten that far yet. When I burn a metal business card the graduated scale along the side of the gantry indicates “257”.
When I chucked up a tumbler I measured from the bed of the laser to the top of the tumbler and got 172 mm.
“Alexa, what is 257 plus 172?” Answer “429”
While not super sophisticated………it works fine. Crank the pointer on the gantry up to 429 and fire when ready, Gridley. For my settings on this Stanley 40 oz. Tumbler I used:
- 375 mm/sec speed
- 50% power
- 1270 lines per inch
- 1 pass
- Scan angle of 90 (if engraving across Y axis I’d set this to 0)
Listen to the crackling! That means all is well.
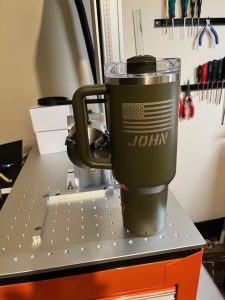
Clean up was just a paper towel with isopropyl alcohol followed by dish soap and water just to be hygienic. Turned out great.
General Engraving Tips
Two words. Scan Angle. I have found that on most items after setting up your engraving parameters then create a Sub-Layer in Lightburn with identical settings except for the scan angle.
You will see in the upper right of the photos there is a slider for “Output Sub-Layer”. Turn that on. Create your settings then hit the “+” sign to create a sub-layer.. Make your settings identical but then set your scan angle 90 degrees off the original layer.
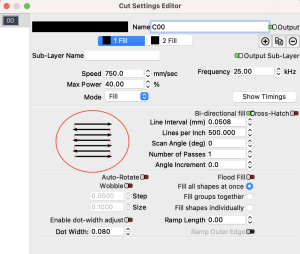
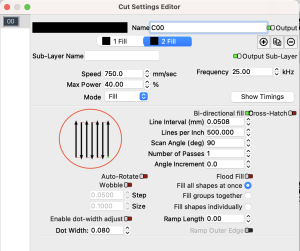
Making 2 passes at different scan angles can really make things pop.
Doing those opposing passes really made the white stand out. Anyway, that is just a tip I have for you to make your engravings really stand out. Certainly you can play with the scan angle settings and try various things but I like two opposing passes 90 degrees out from each other.
Here’s one more example of this technique on an RFID aluminum wallet.
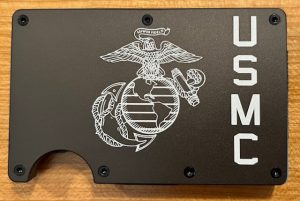
Excellent results.
Additional Thoughts
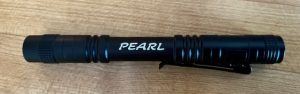
I’ve spent some time engraving RFID wallets, challenge coins, business cards, flashlights, and tumblers using the rotary device and really learned a lot. Initially I thought there would be a huge learning curve with the Monport fiber laser but beyond the initial setup, there really isn’t.
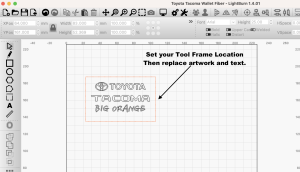
PRO TIP: Business cards and RFID wallets are the same size. Set your alignment fence on the laser bed and align a tool frame in EXACTLY the same place in Lightburn. Confirm by framing your roughly 86 x 54 mm rectangle. Once the location is set then just cut and paste in your text or artwork into that Lightburn template and rename it. Rinse, repeat.
This will give you perfect alignment every time for both business cards and RFID wallets.
Conclusion
The Monport 30 Watt Fiber Laser is a valuable tool in your laser engraving arsenal. It provides speed, accuracy, and the ability to mass produce items quickly. I’m not sure why I waited so many years to get a fiber laser. Now I am so happy that I have one.
I promise you that if you are in the laser side hustle you have had to reject work because you were unable to engrave on metals. At current prices, and with the coupon code John10 for an additional 10% off a fiber laser does not cost a lot more than a desktop diode laser WITH ALL THE ACCESORIES you will eventually buy for it.
A true laser side hustle shop should have a desktop diode laser, a CO2 laser, AND A FIBER LASER. Otherwise you are just missing out on potential orders and jobs.