Monport Laser 30 Watt Fiber Initial Impressions
Probably the most common question to someone with a side hustle laser is, “Can you engrave metal with that?”. For the most part, with a diode or CO2 laser, the answer is “No”. Or the answer is “you can lightly mark some metals but not engrave them”. To truly engrave on metal surfaces you need a Fiber laser. It is way past time that I get a fiber laser for my shop. And the one I chose was the Monport Laser 30 Watt Fiber Laser. $2999,99. Monport has provided my readers a 10% discount on all machines. Use John10 at checkout.
Full Disclosure: While I purchased this machine with my own funds, I was provided a nice discount in return for a short series of reviews. At no time has any pressure been applied to me from Monport to provide a positive review.
What you’ll read below is my honest opinion of the machine. This blog will generally be a “First Impressions” entry.
And while I have only owned the machine for a few days at the time of this writing I have already formed a strong opinion. And that opinion is “Where have you been all my life, fiber laser?”.
The Equipment Reviewed
Included items for review are:
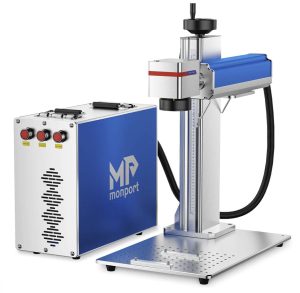
- Monport 30 watt fiber laser with 200mm x 200mm F-Theta Scanning Lens
- Monport 80mm Three Jaw Rotary *
- Monport 150mm x 150mm F-Theta Scanning Lens *
- Monport 300mm x 300mm F-Theta Scanning Lens *
* Will not be reviewing in this Initial Impressions blog.
Laser Features And Software
This is a 30 watt Raycus Fiber laser. Published speed is 7000 mm/sec. Laser wavelength is 1064 nm and has a working area of 8″x8″. The laser can be used with Windows or Mac OS. Included software is EZCAD which is Windows only. The laser can be used with the galvo version of Lightburn which costs $150. Once you purchase Lightburn it is yours forever, however if you wish to upgrade it annually it costs an additional $30 per year. EZCAD is free to download.
I attempted to run EZCAD to try to save a $90 upgrade fee for the galvo version of Lightburn and I lasted almost 24 hours before I bought the upgrade. EZCAD will operate the laser but I found it to be pretty unintuitive to use. Make no mistake though, you can do a LOT with EZCAD. And you will want EZCAD at least initially to set up your laser which i will talk about in a subsequent section.
EZCAD Installation
Prior to using EZCAD you must install the driver. I’m using Windows 11. Download EZCAD on the 30 watt laser product page. You will find it under the “About More” section. Additionally, it comes with the provided USB drive included in the machine accessories bag. Two folders are found within the download. The folder 64x64AMD_LmcV2u contains the driver. Win 7 drivers are found in the folder below (EZCAD_LITE_2.14.16).

Turn on your laser and connect it to USB. Open your device manager and you will find an unknown device.
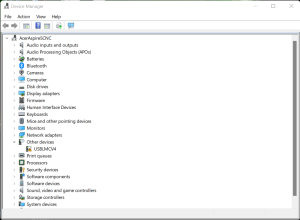
Right click on the unknown device and select Update Driver. Then Browse My Computer For Drivers.
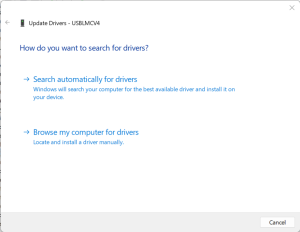
Now click the Browse button.

Navigate to the folder where your Windows Drivers are and select.
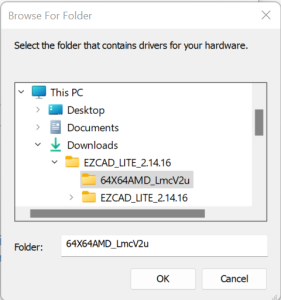
Bob is your Uncle. Drivers for your laser control board are now installed. You can use EZCAD now.

Lightburn Setup
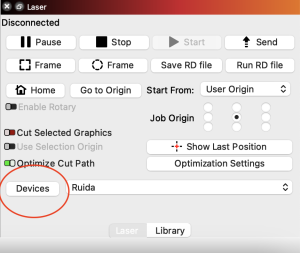
Connect your fiber laser to your computer via USB and turn it on. In Lightburn on the Laser Tab select Devices.
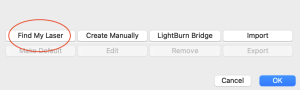
Now select “Find My Laser”
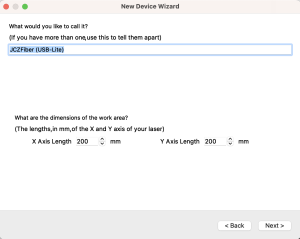
It will find a “JCZFiber” laser.
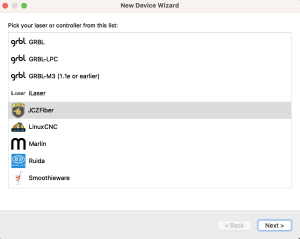
After hitting “Next” type in whatever you want to name the machine and set your bed size at 200mm x 200mm. That’s it. Just accept the new device.
One last thing. If you made a correction file in EZCAD, you can go into “Device Settings” on your newly installed laser and install the correction file there. (Discussion on that in the following paragraph).
Setting Up The Monport Laser
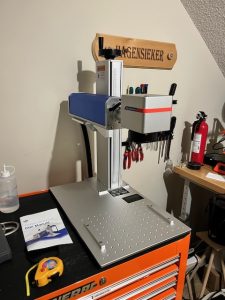
I received the laser on 15 August 2023. The laser was extremely well packaged in a fairly large wooden crate that has a shipping weight of approximately 100 pounds. After extracting all the components and carrying them in the shop I realized the included paper manual does not provide any installation instructions. The included USB memory stick however does contain the instructions needed to properly set up the laser.
Fortunately, installation was pretty intuitive and i had my Monport laser assembled in just a few moments.
Fiber lasers are a completely different animal from a desktop diode, or CO2 laser. I really thought i was in for a strong learning curve but it wasn’t nearly as bad as I thought.
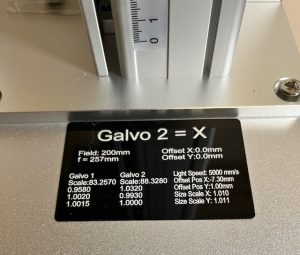
Probably one of the first things to note is that F-Theta lenses create a bit of distortion. This distortion needs to be compensated for in your laser software. There are two ways to go about doing this.
1. The Monport laser has a plate mounted to it with correction value data noted that are applied manually. Refer to the photos and videos on the supplied USB stick for proper configuration in EZCAD software.
2. EZCAD software, which ships with the machine, has a program file named CorFile2.exe that prints a test pattern. The user then takes a series of measurements from the pattern and inputs them into the CorFile2 program. Upon completion of that task you simply point EZCAD to the correction file that you configured.
Recommended Option
In my opinion option #2 provides the most accurate results. i found a great YouTube video showing the process here. Also that correction file can be used in Lightburn. If you intend to gravitate towards Lightburn software go ahead and perform option #2. It will make your life so much easier.
And remember, if you change lenses, you will have to apply correction data for each new lens. The data supplied by Monport only seems to cover the default 200mm x 200mm lens.
Additionally, if you use more than one computer with your laser then using a correction file will allow you to set up each individual computer software instance much quicker than configuring multiple parameters manually.
However you accomplish this, once you correct for distortion your Monport laser will create perfectly sized and shaped objects. But you absolutely, positively have to tell your software what the distortion correction is. And you have to do this with every lens you install. DO NOT SKIP THE LENS CORRECTION STEP.
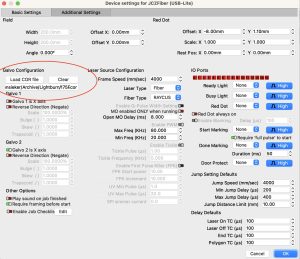
Offset Alignment
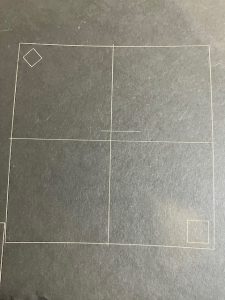
Once I corrected for distortion I noticed that the framing box was just below and to the right of where the actual engraving was. You must also tell your software what this offset is. Below is a screenshot of those settings applied in Lightburn device settings. NOTE: These are my settings. Yours will probably be a little different. You can measure your offset with a tape measure and then fine tune it by tweaking your numbers until you achieve perfect alignment.
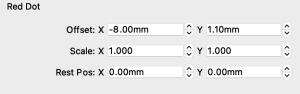
Once your distortion is corrected and your offset alignment applied your fiber laser is ready to roll. Now my framing box appears EXACTLY where the engraving is going to occur.
Focus
Next thing you have to do is focus your machine. Essentially you draw a box, set it to engrave “Continuous” and then while engraving you turn the gantry height wheel until the engraving is bright, throwing sparks, and is as audibly loud as it can be. Once you see that you are getting max intensity, stop your burn and measure the distance the lens is from the item being engraved and that is your focal distance length. At this point most people make a measurement jig instead of using a tape measure (which is included with the laser).
First Burn
After burning the word “test” on the black board I did the correction file test I decided to get right to business and produce an actual item. Every time I sell something I include a metal business card, so I figured I would start there. While the heading says “First Burn” this is actually probably my 3rd burn. My first business card has some super small detail which didn’t quite fill in. I changed my power and speed settings and gave it a second pass, and then a third pass whereas I declared it to be a great burn. Once I got the settings dialed in then I recorded the first single production burn.
Great results and super fast. A lot of reviewers will put a timer on this and post engrave times, but not me. Just know this is way faster than any machine I’ve ever done and my business cards look more professional than on any other machine I’ve used. This old retired guy doesn’t care if something takes 40 seconds or 50 seconds.
Additional Projects
Now that I kinda know what I’m doing it is time to apply these skills to some other items.
Fiber Laser Examples (click pics to enlarge)


First up was a brass challenge coin. The laser and accessories were sent in different shipments and while I was learning the machine the rotary device showed up. Even though I said I wasn’t ready for that, I did go ahead and knock out a tumbler. And finally I gave one of those RFID wallet blanks a shot.
I think you’ll agree that all these turned out really well.
Wrap Up Of Initial Impressions
I’ll wrap this up here. There is a lot yet to learn with the Monport Laser 30 watt fiber machine. I’ve just begun my journey. For just having it a few days, I’m already cranking out some good looking items. The real trick is figuring out power, speed, frequency, and hatch settings for most of these items. That comes with time and experience although generally I’m off to a great start and great understanding.
The initial setup of a fiber laser is a bit more advanced than using your basic desktop or CO2 laser. There are a few more settings that you need to familiarize yourself with, but the payoff is worth the learning curve.
Owning one of these machines nets you some highly professional looking results without breaking the bank.
What’s Next?
I’ll follow this review up in the near future with a bit of a deeper dive followed by a couple of specific blogs on specific material setup.
Thumbs Up or Thumbs Down?
This is Thumbs Up. Actually, Two Thumbs Up. Owning a fiber laser is a game changer. I cannot count the number of jobs and customers I have lost over the years because I couldn’t engrave certain metals. Not only can I do it now, but I can do it FAST!
The LaserOG highly recommends the Monport Laser 30 watt fiber laser.