xTool 1064nm Infrared Laser Review
I was provided an xTool D1 Pro + RA2 Rotary kit to review for xTool. I purchased the xTool Infrared Laser with my own funds.
So I have been using lasers for a few years now however the ability to engrave metals has eluded me. One of these days I’ll probably pick up a proper fiber laser but I haven’t done it yet. Since I have an xTool D1 Pro 20 watt I decided to grab the xTool 1064nm Infrared Laser.
And as usual this blog will take you through the things that I have discovered while using it and not the typical unboxing video or walking you through the specifications.. The first thing that I discovered was that the box contained the xTool laser module and a power brick, however the power brick didn’t contain the cable that goes from the outlet to the brick.
The Brick Cable
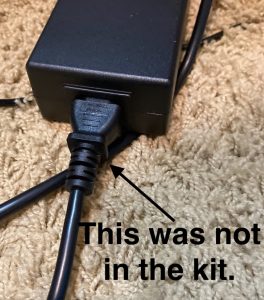
First I thought it was a mistake. The manual shows that the power cable is indeed NOT included.
It’s okay because I guess the presumption is that you already have a brick hooked up to the laser and you just swap in the new power brick.
This is all good but for $559 I kind of think you ought to get the cable.
Anyway, it’s a common cable and I probably have 10 of them laying around the house. No problem.
So I swap out the brick as per the instructions then later I see in the FAQ under #14 that if you own the D1 Pro 20 watt there is no need to even change the brick at all. As long as your brick is capable of outputting 100 watts it will be sufficient. This is not mentioned in the user manual.
Okay, it’s hooked up now so let’s take a peek at how it works!
Before I got it in the mail I read as much as I could about it and there were several reports that the focus bar wasn’t accurate. I did not find that to be the case with mine. Mine seems to be perfectly in focus at the 20mm focal distance. Before using in Lightburn the following settings need to be applied as per this xTool webpage.
LIGHTBURN SET UP
1.1 Switch off the “Enable pointer offset”;
1.2 Switch off the “Enable Scanning Offset Adjustment”;
1.3 Switch off the “Enable laser fire button”;
LET’S ENGRAVE WITH IR xTOOL LASER
The first thing I engraved was black opaque cast acrylic. And brilliant and inventive guy that I am I engraved the word “test” into a test piece.
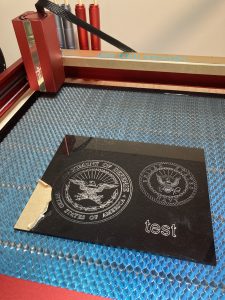
For comparisons sake the DOD emblem on the left was done by a desktop CNC with an engraving bit. The US Navy emblem was done on a CNC with a diamond drag bit. I couldn’t believe how white the word test was and how it seemed raised and how much “pop” it had. Wow! Color me highly impressed.
Then for fun I took an old beat up Swiss Army knife and engraved my name on the blade.
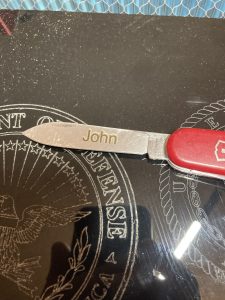
It turned out pretty nice.
Let me put this in perspective. I did this at about 2 or 3 AM in the morning. In 5 minutes I had the IR module installed and I was producing decent results with it.
So my first impressions are that this is ridiculously easy to install and set up.
I wrapped up this session, went back to bed and in the morning decided to try some more black acrylic since it looked so good.
I took some 1/4″ cast acrylic and cut a square with radiuses corners out on my CO2 laser.
Then I engraved the Department of Defense Logo and my name and rank on the acrylic. My goal was to make it look like a door or desk sign. All I can say is “Holy Cow”. This is the crispest and most impressive vinyl sign I have ever made, and I have made a few.
SETTINGS
For the DOD logo I used 10 mm/sec speed and 77.5% power. For the lettering I used 20 mm/sec at 65% power. I sped up and reduced power for the settings on the lettering since it was a “Fill” and not a “Line”. Seemed to work great.
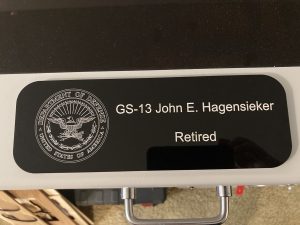
The logo is bright white and all the engraving looks slightly raised. Again this is the most impressive vinyl sign I have ever made. I have laser-ed, CNC’d, and applied vinyl sheet to signs in the past. In short, I have done it all. These are the best results I have ever obtained.
Since that time I have engraved just about every piece of metal laying around the house.
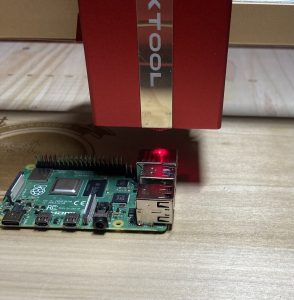
RED DOT ISSUES
One thing I have noted is that laying out your design in Lightburn is problematic because you cannot use the laser fire button or frame your job with the laser lit. No matter how low a power you use to light up things for the framing operation you will etch the metal with your framing lines. This is not good. But I should add that I have never hooked the IR module up to xTool Creative Space software. You’ll see why that matters in a second.
I ask how people frame in Lightburn on the xTool D1 forum and ultimately someone in at the forum asks me “Don’t you have a red dot for framing?” and then it hits me. I bet if I use xTool Creative Space (XCS) software I’ll get a red framing dot. Sure enough, that’s what happened. I used XCS to engrave something and then turned the machine off.
Then the next time I turned on the xTool laser the red dot came on, stayed on and worked in Lightburn. The only thing I can presume from this is that to get the red dot working you first have to have the xTool laser module recognized in XCS as the D1 Pro, 2 watt.
It’s Not In The Book
I want to add that I couldn’t find anything about that red dot in the manual or the FAQ’s. Clearly some documentation updating is in order. So now I’m happy. My red dot seems to be working in Lightburn.
I also noted that if your 20 watt module is set to “Laser Dot” and that if you hook up the IR module and then switch back to the 20 watt module it turns the point into the Laser Crosshairs as demonstrated in the video below.
IR Laser Engravings (click pics to enlarge)


Engraving on metals seems to be a pretty slow operation which must be accomplished at high power settings. A large project is going to take some time, although on acrylic you can move quite a bit faster than on metal. Line settings were 300 lpi.
MY TAKE ON THE xTOOL LASER MODULE
So by my estimation xTool has hit it out of the park.
- The ability to mark metals at a $550 price point is pretty impressive. It’s not a fiber laser and doesn’t claim to be.
- From unboxing to being operational is literally just a minute or two. Very impressive.
- The documentation needs some help regarding the power brick wattage requirement, and enabling of the red dot.
- It needs to be recognized by XCS software first to enable the red dot. (I think).
- This is the best thing I have seen for engraving on acrylic. Opaque acrylics will produce the best results. Not so much on transparent acrylics.
- It can be pretty slow for larger projects on metals.
Thank you for your review. I am currently waiting for Xtool D1 pro and all the accessories to arrive. I have been getting as much information as I can from people like yourself. You are appreciated.
Hi John, I have the Xtool D1 pro as well, and both lasers, but I’m having trouble with both of them, if you don’t mind I’ll explain.
So the small one starts the project but it’s just burning in the same spot, the big one is showing the laser dot but when I press start the laser dot goes off, and with both of them when I press home they go in the back left corner and start making noice, like it wants to keep going, hopefully you can help.
Thank you