
xTool D1 Pro Review
Full Disclosure – xTool provided me an xTool D1 Pro at no cost to review. They in no way whatsoever influenced this xTool D1 PRO review.
NOTE: Almost all my testing is done with Lightburn using the configuration file xTool provides here.
It doesn’t take me long to tell whether something is great, good, or problematic. In the case of the xTool D1 Pro review my conclusion is landing somewhere in GreatLand™.
I’d be remiss in not mentioning that I have considerable desktop and CO2 laser usage and I know just what to do to reveal problems right away.
While waiting for my D1 Pro to show up I began asking people questions and joining forums and groups. The first thing that hopped off the page for me were people asking “How do you keep things straight?”
STRAIGHTNESS
I’m going to refer to this as an “issue”, and not a problem because almost every laser made, maybe with the exception of industrial lasers, don’t have any immediate method of straightening. Someone I know owns a D1 Pro and has the honeycomb kit . I asked him to provide me any input before I received my machine and wrote my review. One of his bullet items was:
“The honeycomb panel set isn’t currently able to be fixed to the machine itself in anyway, which makes it very difficult to maintain square between the panel and the machine itself. “
There are a couple methods for overcoming this issue of keeping things straight.
Method number 1: Lay an item down as straight as eyeball possible and Frame, Frame, Frame. When you think it is straight……..Frame Again before burning.
Method number 2: Make a waste/spoil board and burn gridlines on it. A spoil board is simply attaching the laser to a sacrificial piece of wood that you don’t mind getting laser marks on. This method is highly recommended because I don’t care how good you are……eventually you are going to laser your desktop.
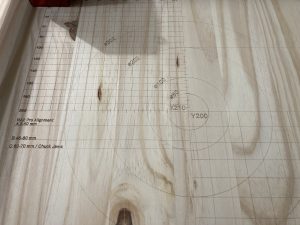
Grid for D1 Pro
While it is real easy to make your own gridlines I found an Etsy design that has absolute coordinates depicted and alignment lines for your RA2 Rotary machine. Cost was $4.75 and worth every penny to me.
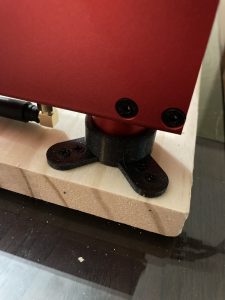
3D printed feet
I attached my machine with 3D printed feet that I found here. (Yes, I have FOUR 3D printers).
This allows for perfect repositioning of the machine along the grid.
The wood I used is 24″ x 26″ and I think 1/2″ thick.
So now we have solved the straightness issue.
Let’s talk accuracy.
ACCURACY
I can provide you the D1 Pro accuracy claims……….but I won’t. Lets real world test them. My grid squares are 10mm x 10mm.
Grid Square Accuracy


Don’t over analyze the pics too much. The ruler curls up on the edges and iPhone cameras barrel distort. And I shot the pic at an angle. Trust me when I tell you that my squares are 10x10mm throughout the length. The bottom right section of the grid has 20x20mm squares and they are just as perfect. And my carpenters squaring devices don’t lie either. Everything is straight to the machine.
So just for posterity I made a 50×50 mm block and a 100x100mm block and measured them with dial calipers. Perfect.
100 mm block size testing

I can tell you from EXPERIENCE that not every laser you buy is going to do this right out of the box. Sometimes you have to dig into Machine Settings to calibrate your machine. In fact this may be the first desktop laser I have ever owned that was perfect. Dead, solid, perfect.
REPOSITIONAL ACCURACY
Again, I can tell you the claims, but I like real world testing. Repositional accuracy is making a 2nd, 3rd or even more passes that land in the exact same spot and do NOT cause doubling or blurring. Desktop lasers are especially prone to this especially when operating at high speeds as the axis movement may cause minor movements of the laser. Another reason to mount your laser to a spoil board. I’ve devised a devious test for reposition accuracy and I’ll run at a high speed.
So far the things that really matter to me are passing every test with flying colors. I want to reiterate at this point this machine is ACCURATE. But that accuracy is always going to depend on a good solid build.
As you get more experienced with lasers you understand that minimizing movements makes your working times faster and more efficient and your finished product is more precise. So what I just did was a worst case scenario. If it’ll perform well here, it’ll perform well when you achieve more efficiency. I’m sure you could devise a worse test than this, and so could I, but for me this is way more than enough to expose a serious fault.
NETWORKING
The xTool D1 Pro has the ability to connect to a WiFi network. I think that might be beneficial to some, but not to me. That being said, my CO2 laser is connected via ethernet but only because Lightburn and Mac OS X have USB issues. While I am operating the CO2 laser I am standing right next to it at all times. Since I moved the connection to Ethernet I’ve had zero connectivity issues with Lightburn.
I’ll dabble with the wireless on the D1 Pro but I don’t think it is necessary. You should be standing over your laser operations, not down the hall in the other room while it is burning. Unattended laser operations are a bad idea. Connectivity is a good idea and extra connectivity is a great idea but you should still be right there no matter how you are connected. I don’t see the benefit, but I am not every user. I will cede that sending files directly to a laser generally results in less problems, especially considering computers hibernate and USB power sometimes shuts off after a pre-determined time.
Forums for lasers in general are full of “my laser just shuts down after 15 minutes and my burn is a 30 minute burn. HELP!” USB ports going to sleep are usually the culprit. Having a file on a TF storage card negates the possibility of this happening.
Lastly, regarding wifi……..it isn’t supported by Lightburn which is what I’m going to use 99% of the time. Best I can tell if you want to operate your laser via wifi you’ll have to do it with xTool Creative Space software. I do see where being not tethered to your computer is a big bonus.
ENGRAVING
I followed the engraving and cutting parameters recommended by xTool for a Pine Board. Actually I think it said 50 mm/sec at 50% power. My first run was at 45% power. Don’t ask me why I modified. I kind of fall in that category of user that thinks lower power is better especially when using a diode laser. Running a diode laser full power will degrade it faster.
Anyway my run at 45% power compared to 20% power created similar results. If you look inside the ff’s in the word coffee you’ll see some very minor anomalies there in the 20% power burn. It is just a little less clean in there.
Also I should state that I ran this file much smaller than I typically do, and with no air assist. Another “worst case scenario”, if you will. I was kind of expecting some flare up at 45% but it never really happened. And because I shrunk this down small I kind of expected this to be an illegible mess, and in fact that is what I was TRYING TO DO. The xTool laser head seems to be pretty precise. I’m reasonably certain this exact size file with no air assist on my Ortur Laser Master 2 would be not nearly as crisp.
Had I used an air assist I’m confident this graphic would have been super clean. But at this point I am testing and reviewing. Not making stuff for customers.
Engraving Parameters

If you really stare hard at that pic you’ll notice there seems to be more burn marks on the 20% power burn. This is probably the wood composition as the wood near the top of the pic is darker and possibly more dense which creates a cleaner, crisper burn. Oh, the joys of woodworking.
Now let’s try a keychain bottle opener which is anodized aluminum. I have a file setup and I burn these on my CO2 laser. Let’s test it on the D1 Pro.
OH BOY DID I LEARN A LOT ABOUT MY LASER HERE. Backstory. When burning my grid pattern the designer said to change from the laser crosshairs to the laser dot in XCS software. I did and I left it there.
Then I framed my bottle opener and it immediately started engraving TO THE LEFT of the observed frame in Lightburn. What the hell? So then I tried to do it in XCS. After much fumbling around I got a burn but I was obviously getting some kind of reflection as I was getting shadowing. What the double hell?
That’s when I learned you need to disable the pointer offset configured in Lightburn if you use the laser dot.
Pointer Offset in Lightburn Device Settings

Instead I just switched back to the crosshair pointer and it then started burning EXACTLY where I told it to burn.
Bottle Opener Woes


Ultimately, I’m going to continue to make my bottle openers on my CO2 laser, but make no bones about it, you can do it with the xTool D1 Pro. And It looks good. I had to use pretty high power and low speed though. Burning anodized aluminum cleanly on a diode laser really expands your repertoire and bag of tricks. Happy to see it can handle this task.
COMIC RELIEF TIME
Because I can be sometimes forgetful I decided to put my vinyl sign maker to good use to remind myself to always focus.
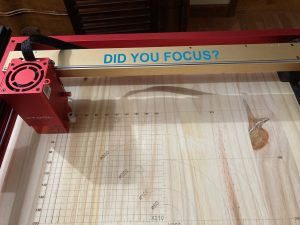
Did You Focus?
CUTTING
This will be tough for me. No matter how good this thing cuts, I own a CO2 laser and cut acrylic and wood frequently with it. So anything I do here will be compared against that. I also have a couple of Ortur Laser Master 2’s and I’ll try to keep my comparison focused (no pun intended) on other diode lasers.
Speaking of focus……….Lots of people focus to the top of the material they want to cut. When cutting you need to focus to around the CENTER of what you are cutting. Forums are full of cutting woes stories. When you focus normally the optimum beam strength is right on top of your material. Every subsequent pass you make where the cut goes deeper the beam gets less efficient at cutting.
The D1 Pro 20 watt has a Precision Focus Adjustment to help with this.
| THICKNESS | SCALE |
|---|---|
| 8mm | 2 |
| 10mm | 3 |
By default your laser focus should be set to zero.
Precision Focus Adjustment For Cutting

Remember, focus for cutting should be aimed towards the center of the piece you are cutting…….not the top of the material.
So I will cut some 5mm plywood material and set the focus around 1, since a setting of 2 is for 8mm thick material. I can blast through 5mm plywood with my CO2 laser in one pass and very minimal charring. Also I am most definitely going to hook up an air assist for the first time while doing this. Cutting without air assist is not a great idea.
I’ll use this Air Pump that I bought on Amazon. Just because I’m using this doesn’t mean you should run out and get one. It’s adequate and it moves a lot of air. xTool sells an Air Assist Set as well. I don’t own the xTool pump but I have been watching videos on it and it runs pretty QUIET. The pump I linked is LOUD although I think it moves more air. Anyway, on with the cutting.
UPDATE: As luck would have it I have a friend who also owns a new D1 Pro. He owns the Air Pump and I had him plug it in and I took a quick video. It is so quiet you can barely hear it.
Here’s my first cut. No editing. I wanted to show how this first attempt went, good or bad.
I’m pretty content with the cleanness of the cuts. Just brown goo on the backside. This is where having your parts sitting on honeycomb really reduces this kind effect. Essentially all the hot smoke gets trapped underneath. Combine that with the wood oils and saps and it’s messy. Almost impossible to eliminate 100% but that’s what sanders are for.
Okay, I think I hit most of the high points here in the xTool D1 Pro Review. Straightness, Accuracy, Engraving, Cutting and a few other things.
I will do another review on this after I’ve used this a longer period of time and I’ll most definitely do a review of the RA2 Pro Rotary. I have many rotary devices including Ortur, and OMTech, and I even have one I 3D printed that is low profile for a K40 laser I once owned.
Additionally, I didn’t tackle Support because I haven’t encountered a need to utilize xTool Support. On the web you will see that some customers say it is awesome and some say it isn’t awesome. Fairly typical of any gadget you buy. Time will tell here and again I know two other people locally that own D1 Pro’s and I should have a handle on support given some (hopefully more lengthy) time.
OTHER CONSIDERATIONS
I just performed a lens cleaning for a couple reasons. Then I had a flame up alarm when cutting leather and stopped to do an inspection. I also planned to do a cleaning as part of this review as well.
While everything was perfectly fine with my laser I did note that the laser lens design is pretty great. The lens has a removable protective mirror which is a pretty great design idea, if you ask me. Disassembly is easy and cleaning steps are easy to follow.
While I had everything accessible for cleaning I decided that I wanted a spare protective mirror assembly because I know for a fact that stuff happens to lenses and covers. One good flare up could damage that mirror and having a spare on hand just makes sense. It makes the difference between carrying on, or stopping for a week waiting on a part.
Initially I thought no spares were available but there does seem to be a spare parts kit for the D1 Pro 20 watt laser for $45.99. I do wish I could buy JUST the protective mirror though. In fact having a couple of them on hand would be cool.
UPDATE: xTool Support answered my question and said that the protective mirror would be available on the website for sale soon.
2nd UPDATE: I received the 20 watt spare parts kit and can confirm it contains the protective mirror (or they sometimes call it the lens cover or protective lens cover).
20 Watt Lens Parts Kit xTool D1 Pro


CONCLUSION FOR xTOOL D1 PRO REVIEW
- Exceptional accuracy. The best I’ve seen in a desktop laser.
- Cuts way better than I thought it would. Diode lasers just aren’t the best for cutting. I actually did not expect this machine to cut as good as it did. This is viable for cutting thin woods although I think I’d recommend getting their Honeycomb Panel Set.
- The Precision Focus design is BRILLIANT and extremely helpful for cutting.
- Working size bigger than any other desktop laser I’ve owned.
- Rigidity of the frame is exceptional aiding in great accuracy.
- Although I didn’t mention it, it is a little loud however the big cooling fan has a big job to do and a cool diode laser is a happy diode laser.
Lastly I won’t add this to my conclusions list but usually when you get a DIY hobby tool of any kind, the first thing users will do is UPGRADE. They’ll 3D print ingenious devices to make things more efficient. Let me say this in all capital letters:
I DON’T SEE ANY REASON TO UPGRADE THIS DEVICE OR HACK IT IN ANY MANNER. MY ORTUR LASER HAS ALL MANNER OF 3D PRINTED UPGRADES ON IT, BUT THEY HAVE REALLY COVERED ALL THE BASES HERE. AIR ASSIST TUBING HOLDER BUILT IN, EYE PROTECTION BUILT IN, FOCUS MECHANISM BUILT IN………………LOVING IT!
And after all the fun of testing and reviewing…….I decided to make something with it!
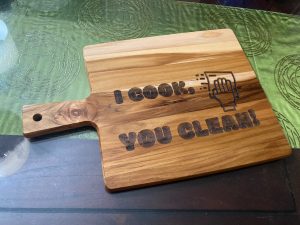
Teak Board
I hope that my xTool D1 Pro Review was helpful in some way.