xTool RA2 Pro Rotary Review
FULL DISCLOSURE – I was provided an xTool D1 Pro with an RA2 Rotary Pro at no cost to review. xTool has in no way attempted to influence my review.

I’ve been given the great opportunity to review the xTool D1 Pro and included in the kit was an xTool RA2 Pro Rotary device.
There are a lot of videos online that show the xTool RA2 Pro but most of the ones I have seen are familiarization, and unboxing videos.
I appreciate all these reviews and learned a lot from all of them but when I get my mitts on a piece of gear I want to fill in the gaps that others may not touch on and I will discuss Lightburn settings quite a bit in this blog.
Regarding unboxing though……….my kit was missing the small bubble level. Obviously that doesn’t affect assembly or use of the machine so it won’t affect anything discussed here. Actually I have a couple of those mini bubble levels around here somewhere so no harm, no foul.
FIRST OBSERVATIONS
I own several rotary devices. I have an Ortur YRR, two OMTech rotaries, and I even 3D printed and built a low profile rotary device that I used in an K40 laser that I used to have. So, I am no stranger to rotary devices and their use.
Every other rotary device seems to do only one thing. To make them do two things you have to hack on them a bit.
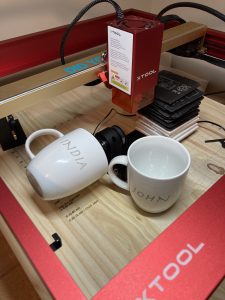
Clearly though, the RA2 Pro is in a league by itself. The sheer amount of ways it can be configured are staggering. After dabbling with the thing for a whole day I did notice ONE glaring omission. One of the ways you can configure the machine is to place the chuck facing outward. You can then raise the height of the whole assembly by putting risers under the rotary. Most people will probably use a block of wood. My pic below doesn’t depict any risers under the RA2 but it does show me counterbalancing the rotary using slate coasters.
RA2 Rotary Suggested Improvement (click pic to enlarge)

At this point, as I stated above, you have to counterbalance the other end so the xTool rotary assembly doesn’t tip down on the chuck end. What if, what if there were two holes on the end of the base board that a user could run a couple of wood screws (or bolts) into the wood riser or spoil board? If you specialized in one particular rotary operation you could just secure it once and be done with it. And yes, you could drill your own holes if you really wanted to do this.
Next suggestion:
The kit I received had 8 risers. You can see them in the pic above in the rear right corner.
These are a gigantic improvement compared to other desktop lasers and in fact to perform rotary operations on my Ortur Laser Master 2 I had to 3D print these giant Lego looking blocks.
Milled aluminum risers are an AWESOME touch, but after playing with the rotary all day …….I wish there were 12 in the kit.
Raising the machine with 2 under each leg is pretty awesome for tumblers but I did a rotary operation on a 5″ diameter spice well I made on my CNC machine. It just BARELY FIT, and had I raised the rotary (as discussed earlier) it would not have fit under the laser head.
5″ Round Part on RA2 Rotary (click pic to enlarge)

I might be the exception, rather than the rule and xTool does sell them, so I bought another set of risers. I got mine from the xTool Store on Amazon, though.
Let’s talk practical common sense……….while the risers are nice……..use whatever works to get the height you need. I’ve seen so many people using canned food containers under each leg to raise the machine it isn’t funny. And it isn’t funny…….it’s brilliant. Use what you got, folks. One of my favorite quotes in life is from Thomas Edison.
“I have not failed. I’ve just found 10,000 ways that won’t work.”
My last observation is that with some parts you may want to remove the plexiglass eye shield from the laser head when doing rotary operations. It really makes it difficult to align your part with any marks you may have made, and it is difficult to really see all of your framing operations with that orange shield in the way. Just remember, if you remove that shield to always WEAR YOUR EYE PROTECTION.
LIGHTBURN SETUP
I scoured the web looking for that elusive video that shows you how to setup the RA2 with Lightburn and I never really found it. I did however find the perfect setup guide on xTools Support page oddly enough in the RA2 Manual. Go to the part that says “Use Software To Operate RA2”. Their settings are perfect. And I swiped their screenshot from the manual below.
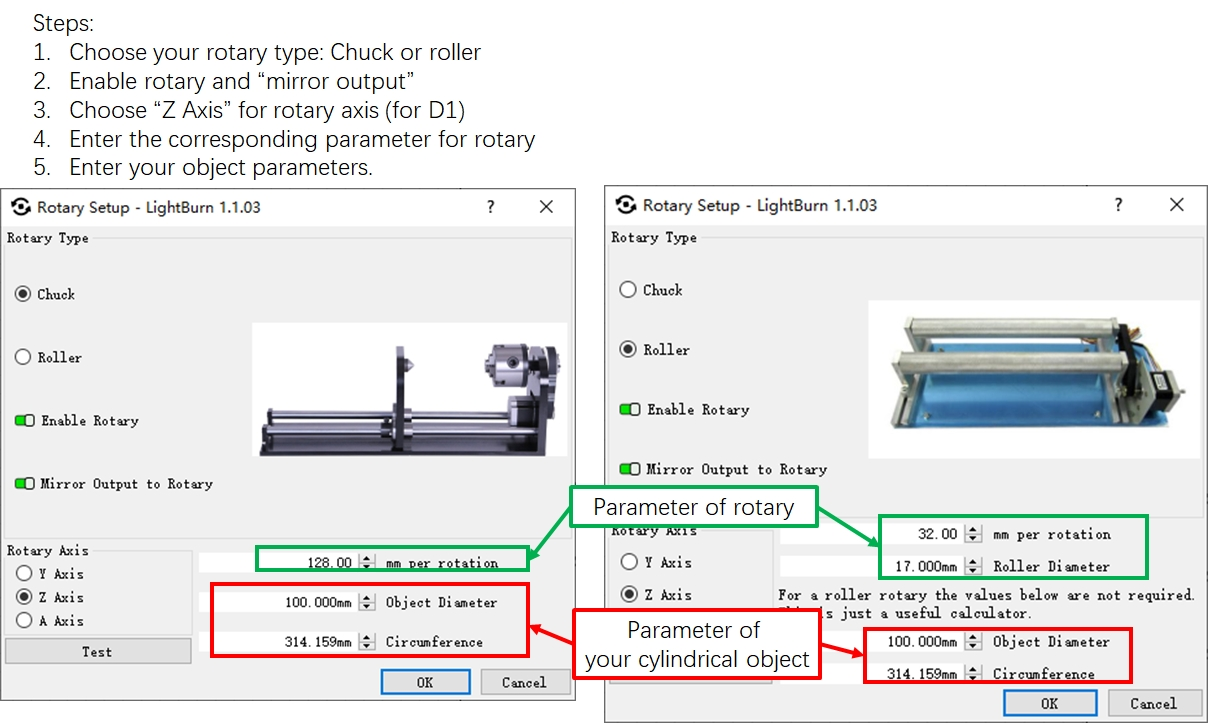
In a nutshell, if You are using the roller, your steps per rotation are 32mm, and the roller diameter is 17mm. When using the Chuck, the rotation settings are 128mm. The green boxes are what your constant settings should be. The red boxes are the diameter or circumference of the part you are working on and you need to fill it out EVERY TIME FOR EVERY ITEM.
Now, DO NOT just fire up the laser. TEST YOUR SETTINGS. And you can test it with the Test button on the Rotary Setup page but then I recommend doing it again in Lightburn, because Lightburn is where you are going to push the Start button.
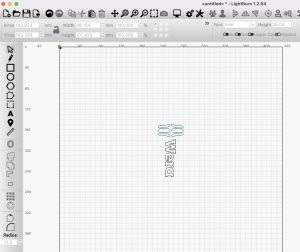
In my example below (using the rollers) my diameter was 87.313 as measured with dial calipers. When you fill one or the other out the field automatically computers. My circumference computed to 274.302mm. Go into Lightburn and make a rectangle that is exactly 274.302mm tall and extremely narrow, just 1 or 2 or 3 mm’s wide.
RA2 Pro Rotary Testing (click pic to enlarge)

PRO TIP: Now that you have a block set up in Lightburn that is the length of the circumference of your part, you can widen the block to the size of your working area and drop your text or logo in the block and make yourself a template. With this template you can then set up perfectly centered items on a tumbler or cup or mug. AND BURN ON BOTH SIDES OF YOUR CUP WITH ONE PRESS OF THE START BUTTON.[kad_youtube url=”https://youtu.be/-iot94DopMk” ]
Here’s an expansion of my PRO TIP above. Here’s how to do double sided output in one operation.
Now, put a sharpie mark on your cup and align the laser to that mark. When you frame the part it should perform one perfect rotation and return to the mark you placed on the cup. This video will explain the process.
NOTE: The video uses settings for the chuck. Roller set up is the same, just make sure to change the mm per rotation to 32.
MIRROR OUTPUT, YES OR NO?
Well, it depends. When using the roller settings and the end of the tumbler on the left side I did not need to mirror the output.
I only had to rotate the design 90 degrees in Lightburn to create a properly oriented burn.
However, when using the chuck in any configuration I had to mirror the output or things print upside down and backwards.
The best thing I can tell you to do is to do what I did and take a roll of tape or some other sacrificial material and do a test run. Another thing you can do is to wrap construction paper or tape around your item and set your burn at really low power so you can observe the direction of the output. BE CAREFUL AND TEST FOR CORRECT ORIENTATION BEFORE YOU BURN.
USING THE xTOOL RA2 PRO WITH THE GRID
There is a popular grid available on Etsy which I purchased. There are alignment marks made in the grid already for placement of the xTool rotary. This allows you to center your part PERFECTLY. My example below is just when the roller is in the C position or the Chuck and Jaws are being utilized. If the roller is in the B position, you would use the B line.
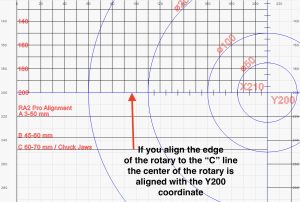
While this is extremely helpful I want you to consider this…………when the rotary is plugged into the machine the laser head only moves left and right. It does not move front and back. YOU DON’T REALLY KNOW WHAT CENTER IS UNLESS YOU SET IT FIRST.
GRID TIPS
PRO TIP: Before you connect the rotary make sure to move your Y axis to 200 and then turn off the machine and connect the rotary. Take care not to move the rails forward or backwards after you have set the coordinates to the centerline of Y=200 when using this grid.
PRO TIP #2: When your machine is set to Y=200 you can also make a Sharpie mark on the frame and the gantry on both the right and left sides so you can move it manually to the correct spot. That would be a good recommendation for a future laser as well. Frame and gantry marks to indicate the Y position.
If you don’t have your center set perfectly it kind of renders the grid null and void except for general straightness. That being said, this is the first time I’ve ever had a grid that was so helpful. For years, on my other 4 rotary devices I have been firing the laser dot and setting my parts straight by eyeball.
PRO TIP #3: Turn the flame alarm down in the settings to LOW in xTool Creative Space software. Mine was set to high and I went into alarm a few times doing rotary practice stuff.
And here is the coolest recommendation of all. Facebook xTool D-Series Official Group user Cody Toothman figured out that you can engrave a line on the top dead center of the stationary part of the chuck for aligning your center PERFECTLY. Absolutely brilliant.
Adding Centering Mark To Stationary Part Of Chuck (click pic to enlarge)

VERSATILITY
While I swore I wouldn’t talk about unboxing and explain parts and how you set them up, I’d be remiss in not pointing out the versatility of the holding systems. In my videos above you have seen how I can hold a tumbler in the chuck, now look at a couple other things you can do.
In addition to just setting round things on the rollers you can spin tumblers, large items, small items, items with handles on them, etc.
Configurations (click pics to enlarge)


I personally feel like the chuck/jaws are more accurate than using rollers. When things spin around on a long roller they will sometimes walk their way up and down those rollers if they aren’t perfectly round, giving you non-precise lines or images. With something held tight in the jaws you get great stability with no chance for your part to walk. I think unless I have to use the rollers for something………I’m always going to use the jaws. Even though the rollers work great. That’s just me, though.
CONCLUSIONS
- Small but mighty rotary that allows you to attach a variety of items, not just roll around round items.
- Used correctly with a grid system you can achieve perfect alignment every single time.
- Jaw system is amazing and can hold more things and more shapes then you think it might. be capable of.
- You can 3D print jaw holders for larger items. The files are on the RA2 Product Page slightly more than halfway down the page.
- A “top dead center” mark should be added to future RA2 Rotary chucks, and also a couple of pre-drilled holes in the rotary board so it can be secured with screws or bolts instead of using weighted counterbalances.
- Configuring for rotary can be a bit of work, however if you are running a business with your laser and sometimes do rotary work, but not always, I strongly recommend owning TWO xTool D1 Pro’s. One can be configured for only rotary operations. In the event one machine breaks you have a backup as well. People never talk about having redundancy or spare parts. Just yesterday I saw a “Help, my machine broke and I have orders to fulfill and I am frantic” post.
I can’t dwell on that last bullet point enough. If your business investment is $1500 roughly (and extra for materials) that is a pretty minimal investment. Go ahead and pony up $3000 and have some extra peace of mind.
THIS IS THE BEST ROTARY OUT OF THE 5 THAT I OWN. It is certainly the most versatile. And it is fun!