
Ortur Aufero Laser 2 Review
Is This The Best Budget Laser Ever?
I own two of the very best laser engravers that money can buy. The xTool D1 Pro (20 watt and 10 watt). But they cost a buck or two. In fact, an entry level laser from just about anywhere is in the $500 and up range. What if you just want to get your feet wet in the laser world as cheaply as possible? Or maybe you want an inexpensive back up machine. The Ortur Aufero Laser 2 might just be what you are looking for.
And right away I need to make it clear that I’m not saying that this is the best laser engraver by a long shot. It is my choice for the best BUDGET laser engraver.
To get the optimum bang for your buck you need to leave the country and head to AliExpress to find the best budget laser engraver. You simply are not going go get a similar deal from the US based sales or places such as Amazon. Of course you can always check the classifieds for a used laser but you don’t really know what you are getting there.
If you search for “laser engraver”, you’ll find some good ones that hover around the $200 price point. However, beware potential shipping costs and make sure you are getting a laser with about a 5 watt optical output. Most anything else is a toy. Also check for coupon availability.
There are several no name lasers on there that price out at some ridiculous prices around $120 but once you click on them you’ll find that price is actually an extension kit or just the laser head. Clicking on the box for the full laser that is 5 watts or so pushes you up around $200 again.
Read on to see what I determined the best deal was.
I finally narrowed this down to a couple of choices. If you are willing to go backwards in time a generation or two the Ortur Laser Master 2 is a good choice.
I found one for $159.23 with a $5 coupon. This comes with an LU2-4LF 5 watt laser head. The reason I did not jump on this deal was because I have owned 2 of these machines previously and sold both recently. Makes no sense for me to buy another for this review.
It’s not a bad laser and great for entry level artisans.
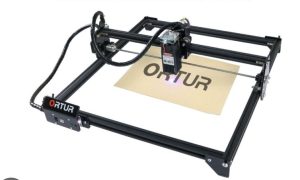
ORTUR AUFERO LASER 2 BEST BUDGET LASER ENGRAVER
So the next thing I ran across seemed to be almost as great a deal. An Ortur Aufero 2 for $178.21 and a $20 coupon. Today when I checked the link it was $187.84 with a $5 coupon so the price seems to bounce around a little.
UPDATE JAN 2, 2023: The price has exploded to $288.99 currently. Other lasers have also had similar price jumps so this is still cheap by comparison. Hopefully, the price will fall again soon. Those earlier great prices might have been holiday offerings.
UPDATE JAN 27, 2023: The price has dropped again to $168.58. Definitely time to get one!

It has the same LU2-4LF 5 watt laser head. The total cost out the door with tax was $169.09. THAT IS A BARGAIN.
Buying the same machine on the Ortur website costs $269.99. That’s a difference of just over $100! The downside to Aliexpress is that is in China and in years past if you ordered something there it would take weeks or months to get. After I ordered the machine I received a shipping notice from UPS saying I would receive it within 7 or 8 days. I can live with that!
Also, the shipment origin point was Commerce, California. Obviously, Ortur pre-positions stock in US warehouses. I got the Aliexpress price with US based shipping. Sweet!
ORDERING NOTE: I was hesitant to mention this but I ordered my laser with an LU2-4 Short Focus laser. After it shipped I decided I wished I had ordered a Long Focus Lens because it is air assist ready. When my laser arrived it came with the Long Focus Lens included. They got my order wrong. But it was actually what I wanted so I didn’t complain.
To talk about ACTUAL TOTAL cost though you have to include the cost of software. I don’t know anyone that uses LaserGRBL. If you don’t use LaserGRBL which is Windows only, your only other real choice is to use Lightburn. Lightburn is generally recognized as the best laser software in the world. It is free for 30 days and costs $60 after that. So the ACTUAL TOTAL cost of the best budget laser engraver is now around $230. It doesn’t matter what desktop laser you buy……..this is how it is for all of them. Laser Cost + $60 for Lightburn.
WHAT’S GOOD, WHAT’S BAD?
Oddly enough there is one really good reason to buy this machine over other machines, even more expensive ones. YOU CAN BUY SPARE PARTS FOR THIS LASER. It is nearly impossible to find a motherboard for a current generation desktop laser. Sadly the mainboard costs about half of the price of the laser, BUT YOU CAN GET ONE. Also Ortur sells several different laser heads for their lasers. 98% of all desktop laser failures are going to be the motherboard or the laser head. If you have those two parts…….you have a good chance of staying operational in the event of a failure.
Sadly the cost of a spare motherboard and laser head costs a lot more than just buying a 2nd machine. Two of these lasers would cost $340 which is still cheaper than one flagship laser from most manufacturers. I think I’d buy two machines before buying one spare motherboard. If money is really tight, don’t buy the motherboard until the warranty expires.
Another great thing about this laser is it has lots of downloadable information. And the GRBL code is unlocked so you can tweak to your hearts content.
What’s Bad? Not a lot but because this is a budget machine there are no limit switches which means the user must manually move the laser head home and clear an alarm before using. More about that down below.
LET’S BUILD OUR BEST BUDGET LASER ENGRAVER AND TEST IT
IF YOU BUILD IT, WILL IT BURN?
The machine I received was brand new and unused! Hurray! I had recently purchased an Ortur Laser Master 3 and it was undoubtedly a returned and repackaged laser. It had tool marks on it and damaged threads in the idler assembly. So i don’t put it past Ortur to send me used or refurbished material sold as new.
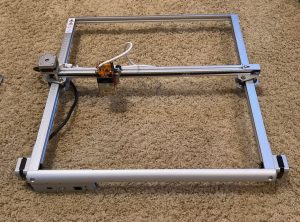
It’s time to build! Assembly is a breeze and just takes a few minutes. All of the difficult and mysterious steps such as belt tensioning are already built into the machine. You essentially just slap the frame together and bolt the laser on top and zip tie a few cables. Ortur has provided a great assembly video.
Here is mine after assembly.
Even though all these desktop lasers are similar in form and function I can’t help but notice the similarities between the Ortur Aufero 2 and the older Ortur Laser Master 2 that I owned previously. Both use a similar motherboard and location, and the Aufero 2 uses the same electrical bonding technique that had to be built into the Laser Master 2 post production. Static electricity would build up as the machine moved and zap the motherboard to death. It was a huge problem.
What it ultimately says to me is the Aufero 2 is not all metal to metal and has areas that are isolated electrically. Translation: The machine is lighter and made with cheaper materials. But hey, this is a BUDGET laser.
Even though the machines look different, I can clearly see that the Aufero 2 is just an upgrade to the Laser Master 2 using the same basic construction and layout principles. The only difference really is those limit switches. Nothing wrong with that. Just saying.
TESTING, TESTING, TESTING, IS THIS THING ON?
Is it on? Because it doesn’t act like it’s on. More on that in a minute.
After assembly I plugged it in and added the device to Lightburn. The installed firmware version was 1.87 so one of the first things I did was to upgrade to 1.90 (latest at the time of this writing.).
This machine has no limit switches (entry level and cheap, remember?) and no homing cycle. Lighburn set up is as follows:
- GRBL
- USB
- Home is front left
- 390mm x 390mm for bed size
- Auto Home Disabled
So then you hook it to Lightburn and NOTHING HAPPENS. There are two lights on the front panel. A red blinking light and a blue light. The red blinking light means “I HAVE NO CLUE WHERE I AM” which triggers an ERROR 9 ALARM.
The user must manually move the laser to the front left position (home) and then in the Lightburn console type “$X” without the quotation marks. This unlocks the alarm. The machine will now frame properly and return back to that point when the laser operation is completed.
But to be very clear EVERY SINGLE TIME YOU START THE MACHINE AND LIGHTBURN YOU MUST MANUALLY MOVE THE LASER HEAD TO HOME AND TYPE $X TO CLEAR THE ALARMS.
NOTE: You can silence the alarm forever by going to a console and typing:
$64=0
You can now restart the machine and it will be ready to roll with no blinking red light. The default setting is $64=1 when means:
$64=1 Force init alarm,boolean Starts Grbl in alarm mode after a cold reset
Worst of all I can’t find any documentation on this either except for the list of GRBL Defaults for the Aufero 2. No way a novice could dissect this. Shame on you Ortur. How did I know how to work around this? I’ve been messing with 2 and 3 axis gear for a long time. The info was buried in the back of my brain. A brand new, novice user might think their machine was broken.
Budget machine, remember? But, however, comma, the mainboard has connections for limit switches. You could install your own limit switches and enable them in your machine settings and I have read tales on the internet where people have done just that.
LIGHTBURN USE
Here’s what the console looks like at boot up. And then the next pic is when you try to start a frame or a job.
Aufero 2 Lightburn Startup (click pics to enlarge)


Now pull the laser manually to the home position and type “$X” in the console. The response will look like this:
$X
[MSG:Caution: Unlocked]
ok
Now the red light quits flashing and you are ready to frame your job or run your engraving operation. After it cuts it will return to the “home” position. And that’s the only time it will. When you turn the machine off, the manual fun starts all over again.
CONCLUSIONS
While finding a capable laser engraver under $200 is not a difficult task, finding one at $170 is even harder. Couple this with the facts that it has some name recognition (Ortur) and it has decent documentation available. Also, shipping is US based and fast. Finally, the ability to purchase spare parts to keep you running in the event of a failure and you have truly stumbled into the best BUDGET laser engraver money can buy.
Doing the manual homing position and unlocking the alarm state with GRBL code is not for the novice or feint of heart. But once you learn how to do it, you will forever know how to do it.
It has some support in the DIY community and a variety of 3D printed “upgrade” parts are available.
This makes an excellent resource to act as an inexpensive back up machine to your more capable laser engraver you are running your business with.
The last thing I will add for full disclosure is that I am an xTool fanboy and prefer their laser engravers. However, xTool doesn’t make a budget laser engraver anywhere near this price point.
If you run a small laser business and a machine failure would ruin your business, or your reputation, you’d be CRAZY to not spend $170 for a machine that will keep you operational while you are waiting for parts.
UPDATE: I 3D printed some riser feet and a focus block holder from here. I had to print the focus block holder at 102% as the first print at the original size was too tight. I attached all to a spoil board and created my own grid in Lightburn. Turned out great.
Aufero 2 DIY Stuff (click pics to enlarge)


Will put this through its paces and blog more on it later.
Pingback: Laser Engraver Costs - THE LASER OG BLOG